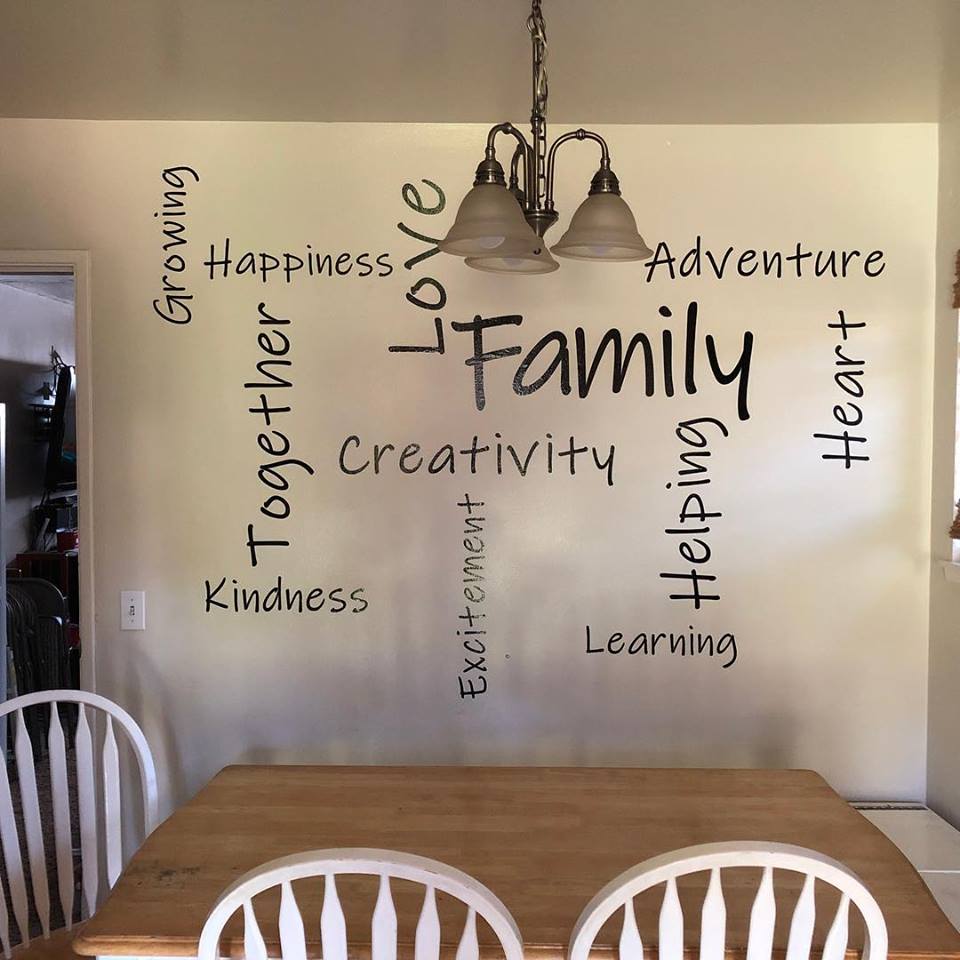
The Process
The first thing I did, once I had a rough idea in my head for how I wanted this to look was to take a picture of the wall I wanted to put the design on. Once I had that I imported the picture in to Cricut Design Studio and began coming up with the words I wanted and laying them out over the image. After I was happy with the design I figured out how big each word should actually be on the wall (measured the wall in real life, then in the picture and then measured each word in the mock up and calculated out how big it should be at full size).
The next step was to create each of the words (or pairs of words) on their own project. I found it easier to manage doing one or two words at a time to be able to take the best advantage of the space on the cutting mats for the Cricut. For the words that exceeded a single 12″x24″ mat I put some aligned rectangles below the words to help with registration. I split the word into letters and then re-grouped and then “attached” the items together to get the best layouts that would require the least amount of re-assembly after cutting and weeding.
Weeding the vinyl took some extra steps of pre-cutting the vinyl with an X-acto blade to make the larger sections I was removing into smaller more manageable pieces, mostly so they would not flop onto the other sections and accidentally peel up letters, etc.
For the transfer tape I ended up with two types of tape and one was a LOT stickier than the other. I also forgot to take some of the sticky off some of the transfers with the new tape (it was late and I was getting tired at that point) and that made removing the tape from the placed decal a LOT harder later on. Shout out to Melissa over at SilhouetteSchool and their tutorial for the tip on using a clean t-shirt to help remove some of the sticky, I should have done it even more, particularly as this wall was problematic to begin with.
Next I cleaned the wall, this is a crucial step to get any dirt and grease off the wall to help the vinyl adhere properly. This was also a reminder to me that my wall has 10+ year old paint and that paint was not high quality to begin with. The years of age and of children putting their hands on the lower part of the wall have taken its toll on the paint and the lower half of the wall in particular has some light micro-bubbling that comes off easily either on the transfer tape or even more so on the vinyl if it gets peeled back off (like when it remains stuck to the transfer tape).
When it was time for the installation I first found the center point and the point at which the large central word (“Family”) would go. I used a laser level to get this lined up. Again I used Melissa’s technique to hang the transfer tape from a blue painter’s-tape “hinge” at the top. I then flipped the whole piece up, removed the backing and laid it down flat. This part worked perfectly! I then started removing the transfer tape and that’s when things got a little squirrely. First off I should have just removed the blue tape and started working the transfer tape off in a downward motion. Second because I had forgotten to de-sticky this transfer tape it really wanted to hold onto the vinyl. Third, because of the poor quality of the paint the vinyl did not want to hold super well to the wall, even after several hard passes with the scraper to press it down firmly. I finally got it to stay, but it was a struggle to say the least.
Moving outward from the center I kept adding words. The words that we further up on the wall (where the paint was better), and where the transfer tape was not as strong and properly prepped were much easier. I also improved my technique and was better about starting at a top corner and folding over the transfer tape completely to make the most extreme angle while removing it (pulling straight down the wall as opposed to pulling out and away from the wall).
In the end the project came out great and matched the design vision and mock up perfectly. The customer (my family who came up with all the words) was happy, so I am happy!
Overall the lessons learned from this project:
- If your paint is really bad consider repainting first and give it proper time to cure before you install your design
- Either find a transfer tape that has the right level of sticky or do a proper job of de-stickying it with a clean rag or t-shirt
- Good planning for layout and sizing makes all the difference, plan ahead and create a good mock up or visualization of your project first
- As always: go slow, be patient and be graceful with yourself and above all have fun!