I needed a wall mount bracket for a Dell OptiPlex Micro Form Factor PC (a slick little PC in a box that is about 7”x7.2”x1.4”). While you can find some online to order for about $50-75 and up I thought it would be a fun project to design and print one rather than purchasing one.
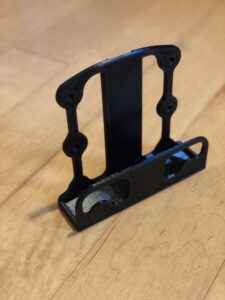
I fired up Fusion 360, found the size specs on Dell’s site and got to work. The firs thing i did  was draw a rectangle that was 6 mm larger on all sides than the footprint of the PC. I extrudes that up 5 mm to give the base some decent strength. I then drew a rectangle on top of that that was 2 mm larger on all sides than the PC and then made some more lines so the two long sides went all the way to the edges while the short sides were only between the long sides. I pulled the short sides up 10 mm and the “front” long side up about 80 mm. The “back” (the side that would be screwed to the wall) I pulled up about 160 mm. I then cam up with a rough design element of some circles and bars and sketched it onto the back side and then extruded some cuts to take out a lot of the material of the back. I did a similar treatment to the front. I did not have the luxury of a lot of time for this project so it is not quite as clean from a design standpoint as i would have liked, but it is still nicer than a plain solid shape, plus, even with supports, it uses a LOT less material this way.
Next up i made a hole for the screw in the front center of one of the circle elements on the front side of the back. I used a countersink hole with a 5 mm home and a beveled 8 mm countersink (this should be perfect for a standard drywall screw).
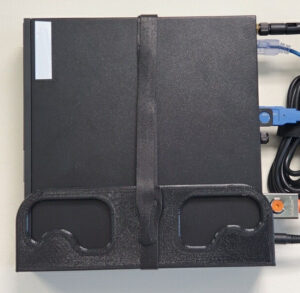 For the last step I cut a channel down the back so a piece of hook and loop fastener could be slipped behind to help secure the PC to the bracket. I used these strips because i use tons of them for work, had a bunch around and I always use them, they are extremely handy.
For the print I layer the model on its back and sliced it at 0.3 mm. I used supports, but i had some issues with the supports having too large of a gap at the top and some sagging and binding issue with the first layers above the supports binding to each other. Next time I will have the gap under 0.5 mm (it was at 1 mm and that is far too large of a gap). I used a black PETG filament. The reason I went with PETG on this one, as opposed to PLA is that PETG has MUCH better layer adhesion and is also much stronger in the final print.
The issues with the layer gaping from the supports was not the end of the world and would totally be hidden by the PC once properly installed. I would have loved to have redone the print, but it takes over 12 hours to print and I didn’t have time to on this project.
All in all it was a fun quick project that solved the problem with 30 minutes of design work, $2 worth of materials and 12+ hours of print time vs. $75 to buy a piece of bent, black painted, sheet metal. I’ll can that a win.
you can download and print one yourself from here.